 by ladyqueen Tue Jan 26, 2010 12:44 pm

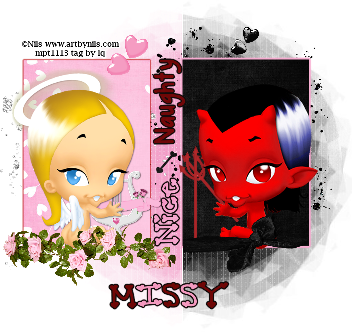
Naughty or Nice Valentine
_________________________
Supplies needed
psp 9 or any version should do
Mask 9 by Rachel you can grab that HERE
eye candy 4000 gradient glow (optional)
My nice or naughty template you can grab thatHERE
Very Pretty Freebie Naughty or Nice scrapkit by Tamie you can find that HERE
Two tubes of your choice I used art by Nils Teddy bear
which can be purchased at My Psp Tubes comes with 4 tubes
angel with and without teddy,devil with and without teddy
you see which ones i used lol.
Font of your choice..Font I used is called LD Amore
______________________________________________________
Ok Lets get started
• open my nice or naughty template up in psp
• go up to image/canvas size width and height 750
• on your layer palette select right rectangle ,selections/selectall/
float/defloat , grab paper 12 or paper of your choice from the kit
copy and paste as a new layer, I moved the paper to the right so that
the hearts are showing in the frame.
selections/invert and then hit delete on your keyboard.
Selections/select none. you can now delete the original layer.
• Do the same thing with the left rectangle I used paper 5 from the kit.
Add your eye candy gradient glow to both rectangle layers, I used a fat glow
changed the color to red on the left rectangle and pink on the right rectangle.
• open up your angel tube or which ever tube you want to use and copy and paste
as a new layer and move over to the left side of the tag, see my finished tag for placement
If your using the same tubes as I am, you will need to resize by 70% they are kinda big.
I added a drop shadow to this tube V=1 H=-1 opacity 53 blur 3 color black
• next copy and paste your devil tube as a new layer place to the right of your tag
and same steps as before.
• Grab element 60 from the kit, copy and paste as a new layer place behind the angel tube
resize by 30 %, place behind the little angel and using your rotation tool rotate so that it sticks
out just a little from your tube so that its like shes holding it.
• Grab element 35 from the kit, copy and paste as a new layer place behind the devil tube
resize by 30% and rotate so that it sticks out a little from the tube like its holding on to it.
see my finished tag for placement.
• select the nice text in your layer palette, select all/float/defloat
copy paper 6 as a new layer, selections/invert and hit delete on your keyboard.
selections/select none.
add a fat black glow to this layer.
do the same thing for the naughty text and the seperator
• Alright now that you have that all finished you can use the elements from the kit
and decorate your tag any way that you like. you can copy my finished tag
if you prefer to do so. its not hard hehe
• after your finished with that, we are going to apply our mask
copy and paste paper 8 as a new layer, bring it over to the far left of your tag
use your deform tool to stretch the paper out so that it fits your tag from
top to bottom.
then grab paper 1 use your deform tool again and stretch so that it fits the tag
move over to the far right.
this is how your tag should look now.

• merge these two papers together.
• with your SOE_Mask10 opened in psp
apply your mask.
layers/new mask from image/ select your soe_mask10
source luminance checked, invert mask date unchecked.
push ok..back up to layer/ delete hit yes
layers/merge group.
bring your mask layer over to the right of your tag so that the black part of the mask is behind the left frame
your tag should look like this
• duplicate the mask, image/mirror
merge these two mask together, and if you want a darker mask in the background duplicate the duplicated layer
• now go ahead and add your copyright and any other info you need
on your tag.
• Add your name, I used two different colors from the kit
and switched between the colors while typing my name out.
i also added a fat black gradient glow to this layer as well.
Thats its your all finished 
I hope that you enjoyed the tut as much as i did putting it together.
This tutorial was written by Reina/LadyQueen on January 26th, 2010 and absolutely no part of this tutorial
may be taken or used without my express permission. Any similarities to any other tutorial is purely coincidental.
bg by LadyQueen bg code by Missy
. Please do not remove!
|
|
|
|


